Sunday, November 26, 2006

Sugar High Friday - Chocolate Truffles

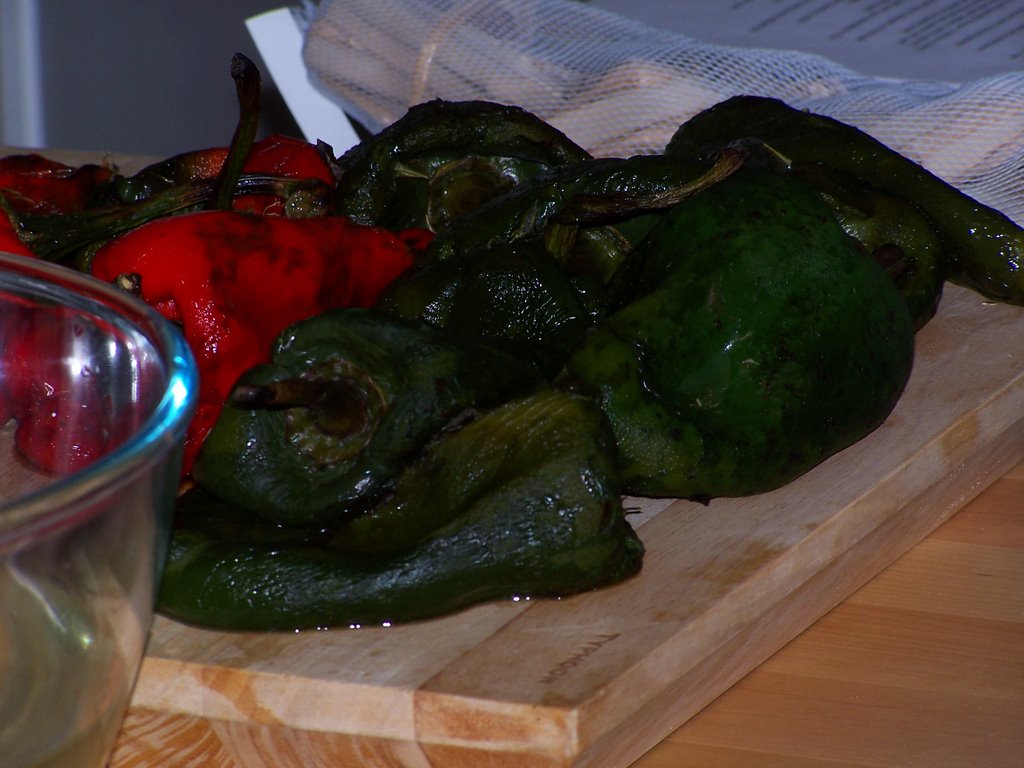
When Johanna said that she was hosting Sugar High Friday and was choosing truffles as the theme, I was a bit apprehensive about playing along. I'd never made chocolate truffles before and more importantly, I don't go weak in the knees at the thought of being given a box of chocolates. Yes, I like chocolate but I don't LOVE it. I'm not the kind that orders anything as long as it's chocolate on a dessert menu. I do like some truffles but I am a picky bastard when it comes to the ones that The Boy is allowed to bribe me with. Salted Caramel Truffles from L'Artisan du Chocolat, English Creams (especially the violet ones- it makes me feel like a granny) from Rococo, any extra dark chocolate from La Maison du Chocolat - to name a few. The chocolate has to be dark and the filling has to be different.

But what the hell I thought, why not. I usually have a bar or two of dark chocolate stored away in the cupboard for a rainy day so I could use it up before my holiday. The next question was- how do I make chocolate truffles? One rather shitty afternoon earlier this week, I received what must've been a sign that I should do this. Whilst doing errands for work, I saw this month's cover of Bon Appetit- CHOCOLATE TRUFFLES. End of discussion. I was in.

I used the recipe from an article on Katrina Markoff of Vosges Haut Chocolat as the base. Once I made a few traditional bittersweet truffles and felt that it wasn't going to go pear shaped, I ventured out into unknown territory creating flavours like chili and lemon-thyme (my combinations and shortcuts follow the recipe).

The recipe uses American measurements; if you don't have U.S. measuring cups, just keep in mind that the chocolate and cream are nearly used in equal measure but there is a dash more cream.

Bittersweet Chocolate Truffles (from Bon Appetit Dec 06)

Makes about 30 truffles

Ingredients:

Truffle Base:
1 ¼ cups heavy whipping cream (I used double cream)
9 ounces high quality bittersweet (dark) chocolate (70% cocoa, I used 72%), chopped, divided

Chocolate Coating:
8 ounces high quality bittersweet (dark) chocolate (70% cocoa, I used 72%), chopped

Optional:
Unsweetened cocoa powder for rolling

For truffle base:

Bring cream to simmer in heavy small saucepan. Remove from heat; cool to lukewarm, 10 minutes.

Meanwhile, stir 7 ounces of chocolate in metal bowl over saucepan of simmering water until smooth. Remove from heat. Add 2 ounces of chocolate; stir until smooth. Stir in cream. Chill truffle base until firm enough to roll, about 3 hours.

Line rimmed baking sheet with waxed paper. Roll 2 teaspoons truffle base between fingertips into ball. Transfer to prepared sheet. Repeat with remaining truffle base. Chill until firm, about 1 hour.

For chocolate coating:

Line another baking sheet with waxed paper. Stir chocolate in metal bowl over saucepan of simmering water just until melted. Remove from heat. Cool slightly.

Scoop some of warm (not hot) melted chocolate into palm of hand. Place 1 chilled truffle in hand and roll in palm to coat. Transfer to prepared sheet. Repeat with remaining melted chocolate and truffles, rewarming chocolate if necessary.

Roll in cocoa powder if desired.

Chill until firm, about 1 hour.

Let stand at room temperature 1 hour before serving.
I used that recipe as the base for my truffles but I deviated and experimented with methods and fillings. To start, I didn’t use two baking sheets I used one and then taped some parchment paper onto the countertop since my kitchen tends to be on the chilly side (a good excuse to bake things). I also used a melon baller to shape the truffles.

The Truffle article does give suggested variations on the truffles- balsamic truffles and mango curry truffles (not too sure on that one) – but the added flavourings need to infuse the cream before being mixed into the chocolate. There were only so many batches of truffle base I could make (which was two) so I rewarmed portions of the base and stirred in the extras. Be careful not to overheat the truffle base. Warm it just enough so that the additions can be mixed in then rechilled and make into balls.

My versions are listed below and all but the last two have had bits stirred into the already prepared base. The last two were made from scratch where the cream was infused with flavouring.

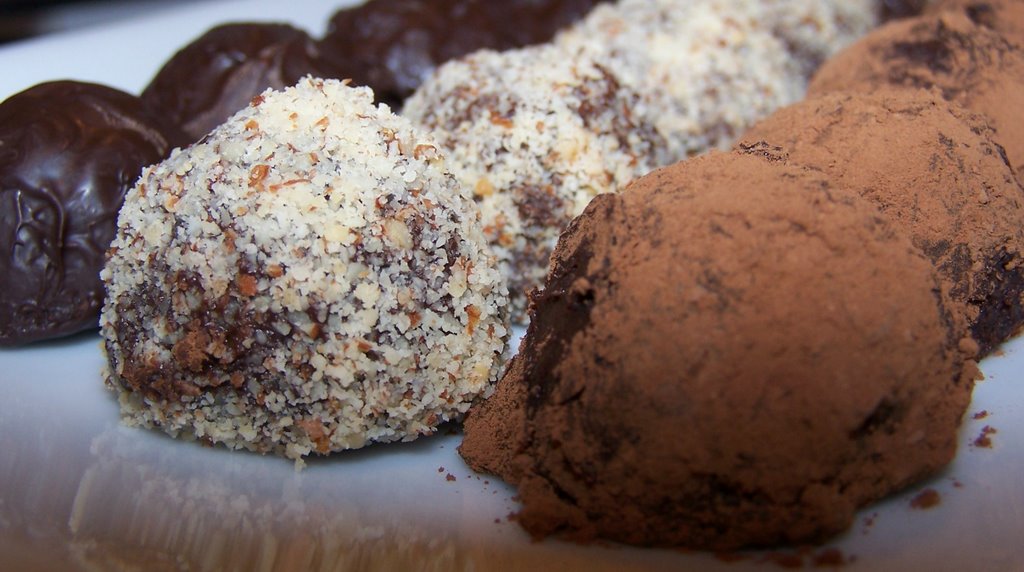
Version 1: Plain dark chocolate rolled in chocolate then coated with chopped salted almonds. (Picture right, middle truffle)

Version 2: Chocolate Raspberry- Two small teaspoons of raspberry jam was stirred into the base and coated with chocolate. (Picture right, far left truffle)

Version 3: Cranberry Kirsch- Two teaspoons of kirsch was stirred in as well as a handful of dried cranberries that I had blitzed into a pulp. The pulp wanted to clump together in the base so next time I would probably finely chop them instead. The balls were then coated chocolate and cocoa and marked with a small X on top. (Top picture)

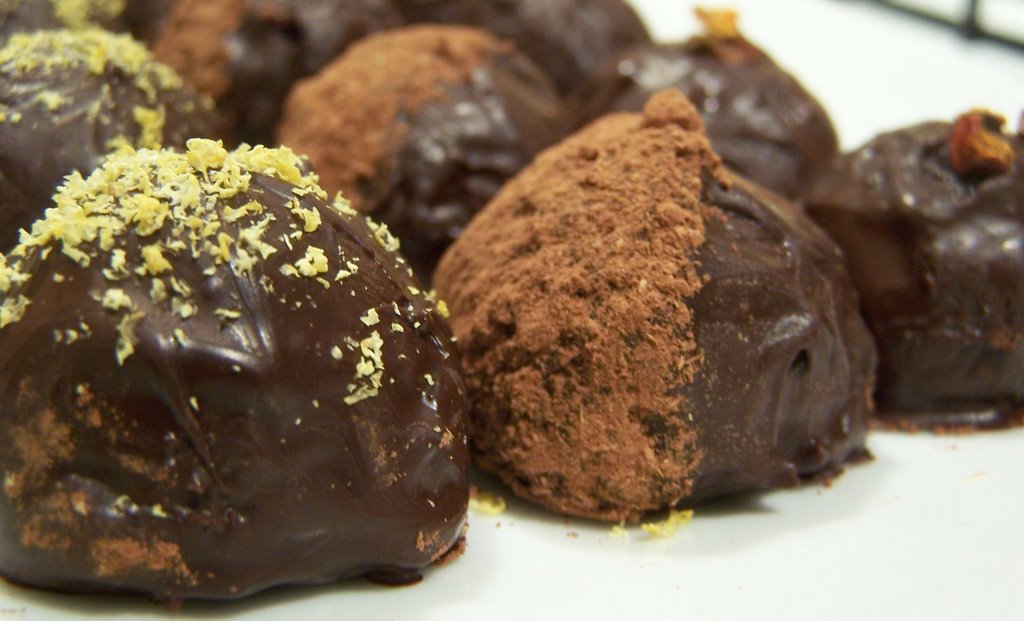
Version 4: Chile- Half a dried Pasilla chile was finely chopped and stirred into the base. The final ball was coated in chocolate and one side was dipped in a mixture of cocoa and cinnamon. (Picture left, middle truffle)

Version 5: Lemon Thyme- The original recipe gave a recipe for Meyer Lemon and Thyme neither of which I had so I infused the cream with the leaves from a couple of sprigs of lemon thyme for 20 minutes. Afterwards, I squeezed a wedge of lemon and stirred the zest of half a lemon into the cream mix, which was then added to the chocolate. That was then coated in chocolate and sprinkled with some lemon zest on top. (Picture left, far left)

Version 6: Jasmin Fruits Concassees- Ginny sent me a pack of jasmine scented dried fruits and challenged me to experiment with it. The fruits look like a tea so I infused a couple of teaspoons on the cream for 10 minutes before straining it into the chocolate base. The truffles were rolled into chocolate with a couple bits of jasmine fruits on top. (Picture above, far right)

Although the prep and rolling of the truffles is time consuming, it isn’t a difficult item to make and I would make again for my Christmas goody bags. I can imagine that it would be a great rainy day messy activity for kids. For someone who isn’t a chocolate fanatic, I have shed loads of the stuff. I have eaten enough during the process that I’m not sure I want anymore so my mates at work (and The Boy’s work) will end up with chocolate filled bellies. I hope that when Johanna reads this she realises that some of these are going to magically appear in her fridge when I see her next week!

Tuesday, November 21, 2006

A taste of home - part dos

You can never have too much Mexican I say and so I continue my epic entry on our day in a Mexican kitchen. Our helpers in the kitchen were Jenni from Pertelote, Keiko from Nordljus, Shuna from Eggbeater (visiting from the States), Jeanne from Cook Sister and Vanessa who doesn't have a blog...yet.

We chopped, sliced and diced our way through countless onions, too many tomatoes and had tingly fingertips from chiles. The effort paid off as we sat down and chowed on yet more food including Chile Rellenos, Tinga de Pollo, Machaca and Fish Tacos.

Chile Rellenos (pronounced chi-lay ray-enos; picture top and below) are one of my favourites and there is a strong chance that it would be one my last meal ever dishes. It means stuffed chile in Spanish and is usually stuffed with cheese (sometimes it gets a meat filling but that isn't common); it's a great vegetarian dish for those who think that Mexican food is all about meat. When Johanna and I met up to plan the menu, I suggested this and had my fingers crossed hoping that she would agree to it.

Cheese, batter and frying oil don't really make for a healthy meal but it is damn good. The sauce in the recipe below is good but one day I hope to score my Tio Meno's recipe for chile relleno sauce. It's been in the family for years and when my grandmother died she only told one person in the family the recipe- Uncle Meno. If you are ever in San Diego, look him up, order the chile rellenos and marvel at the sauce. Tell him that I sent you.

Chiles rellenos (Stuffed Chiles)

Ingredients:

6 large pasilla, poblanos or Anaheim chiles (fresh)
150 g Mozzarella or other quick-melting cheese, thinly sliced
100 g gouda (grated)
60 g self-raising flour
6 raw eggs, separated
flour for rolling (ca. 100 g)
1/4 tsp salt
250 ml grapeseed oil (for frying)

For the sauce (you can also use Mexican Salsa in a jar, green or red to taste):

500 ml passata (pureed tomato)
1 large onion (finely chopped)
2 cloves garlic (finely chopped)
oregano or epazote
chile to taste
50 ml single cream (optional)
oil

Preparation:

Preheat your oven to grill.

Rinse the chiles. Place them in on baking tray and place on the top shelf of your oven under the grill. When the chiles are charring and popping their skins, turn them over to grill in the other side. Pay close attention, as this might not take more than a few minutes, depending on the strength of your grill.

When both sides are fairly evenly charred, remove them from the oven and place straight into a large bowl, covering tightly with clingfilm so the chiles “sweat”. Leave for about 30 minutes, then peel.Cut a slit almost the full length of each chile. Carefully remove all the seeds and membranes, making sure the stem of the chile stays intact. Fill with the cheese.
You can set these aside, for a few minutes or a few hours if you put them in the refrigerator.

To prepare the sauce, fry the onion and garlic in a little oil until starting to brown. Add the chile (if using) and fry for a further minute. Pour in the passata and cook over medium heat for about 5 minutes. Transfer to a blender and work until smooth. Return to the pan and season with salt, pepper and the herbs. The sauce should be quite runny. Set aside for re-heating later.Heat the oil in a skillet (or a deep-frier) until a drop of water sizzles when dropped into the pan.
Beat the egg whites until stiff peaks have formed. Beat the egg yolks with one tablespoon flour and salt. Mix the yolks into egg whites and stir until you have a thick paste.Roll the chiles in flour and dip each one in the egg batter. Coat evenly.

Fry, seam side down on both sides until golden brown. Place on paper towels to drain. Meanwhile, re-heat the salsa in a medium saucepan. Stir in the cream (if using) and adjust the seasoning.

Place one or two Rellenos on each plate and pour salsa over them. Serve

(Recipe Jo Wagner: Chiles (not sauce) adapted from a recipe on Mexgrocer.com)

Tinga de pollo (pronounced teen-ga de poy-yo; picture left) is another favourite and makes a very regular appearance in my house. This version has chorizo and potato in it which makes it heartier.

However, there are many variations on this theme; mine has neither chorizo nor potatoes and is quicker to make. The next time I make it I promise to write it up. It is extra work to shred the chicken but it is a great way to make a small amount of meat go further. If buying organic chicken is usually out of your budget, buying chicken thighs and then shredding them means that you get quality meat and a yummy meal.

Tinga de pollo (Chicken with chorizo and potatoes)

Ingredients:

750 g chicken breast
150 g chorizo (finely diced)
4 tomatoes (finely diced)
2 large potatoes (peeled and finely diced)
2 medium onions (1 half set aside, the rest finely chopped)
2 cloves of garlic (1 set aside, the other crushed)
2 tbsp chipotle chili in vinegar, finely chopped
1 dash vinegar
2 handful fresh coriander or oregano
oil, salt

To serve: 2 avocados, chopped lettuce, corn tortillas or tostadas

Preparation:

Clean the chicken breast thoroughly. Cook it in boiling water with half of the onion and a garlic cloves. Once cooked, let the meat cool and shred into thin strips with your fingers or two forks.
Cook the potatoes in salt water until soft, but retaining a bite.

Fry the chorizo (no oil required) in a big pan, when it’s browning, lift the sausage out with a slotted spoon and reserve. Fry the chopped onions and garlic clove as well as the shredded chicken in the oil from the chorizo. Add the tomatoes, the potatoes, and the chili.

Put the sausage back in the pan. Add vinegar and herbs and season with salt. Let cook until slightly dry.

Serve with tacos or tostadas, shredded lettuce or avocado.

Recipe adapted from: http://mexico.udg.mx/cocina/cocinamex.html Universidad de Guadalajara

I know this is not the most attractive photo you will ever have seen and I highly doubt that it fills you up with so much excitement that you want to rush out and make it, however, Asado de puerco is good. Asado de puerco (pronounced ah-sah-do de pu-erco) has a lovely and deep smokey flavour. This is be a great weeknight meal with a bit of rice on the side (especially if it is cold out).

Asado de puerco

Ingredients:

1 kg pork (fillet or escalope)
250 g Chile Colorado (cut open and stems and seeds removed)
3 bay leaves
2 cloves garlic
oil, salt

Preparation:

Toast the chiles lightly in a pan without burning, then bring to a boil in a pot of water. Remove from the heat and leave to soak for 30 minutes.

When the chiles are soft, chop finely in a magimix or using a hand-held blender – add a little water, if necessary.

Meanwhile, clean the pork and cut into small, bite-sized cubes. Fry it in oil until well browned.

Add the chile sauce and the bay leaves, bring to a boil and season with salt. Set aside until serving, then re-heat.

Serve with tacos or simply with rice, frijoles (black beans) and a salad.

(Recipe Iliana Villareal)

I was slaving away in the kitchen and didn't manage to get a photo of this salad. Nopales (cactus) are not to everyone's liking but if you are in th emood for a culinary adventure give this a go. Ensalada de Nopales (pronounced en-sa-lada de no-pal-ess) is a change from the usual iceberg wedge salad; make it in advance so that the cactus marinates in the dressing.

Ensalada de Nopales (Salad with Cactus Leaves)

Ingredients:

6 tinned cactus leaves (nopales)
100 g Lancashire Crumbly (or other crumbly cheese – like Feta)
2 jalapeno chiles (membranes and seeds removed and finely chopped)
1 shallot (finely chopped)
1 handful fresh coriander (chopped)
half a tbsp of dry oregano
5 tbsp wine vinegar
2 tbsp olive oil, salt and pepper to taste

Preparation:

Drain the cactus leaves from the tin, wash thoroughly and (if using whole) cut into thin strips. Mix the oil, vinegar, onion and herbs in a small bowl, then pour over the nopales and mix thoroughly, Leave to infuse (you can prepare this well ahead).When ready to serve, toss the salad again and adjust the seasoning. Crumble over the cheese and serve.

(Recipe Iliana Villareal)

That's it for part two of my Mexican Fiesta. Still to come are Fish Tacos, Machaca and, to sweeten things up and prove that Mexican food is not just about spice, Flan. Stay tuned.

Thursday, November 16, 2006

T-DAY

In the run up to Thanksgiving next week, and while I decide whether or not I can be bothered to cook a turkey for two, I've been reminiscing over last year's gargantuan feast. My mouth waters when I even think about it. ENJOY!

Sorry for the lack of photos- this was one of my first entries and was before I learned how to publish photos!

Better late than never. In need of a feast before the Pre-Christmas fast, I threw a belated Thanksgiving for myself (regular visitors to this blog will no doubt also remember that the Boy’s Xmas party always falls on T-Day- good news though as I can happily report that there was no puking and no incidents of a drunken nature). As the only Yank in the house, I anointed three Brits and four Australians as honorary Americans for the day. After trawling through cookbooks and magazines and after a few calls home I put together what I like to think of as a tasty little menu.

I was attached to the stove for a few days and there were a few mishaps that I managed to fix. The results must have been good since the leftover ratio was low and everyone’s belly stuck out just a little bit more. It was a real compliment that a few people asked for recipes to add to their own Christmas lunches- especially any dish of mine that gets added to the Shah family meal since I imagine it to be an amazing feast. I have decided to put the full menu up so we (in particular Nat and pals) can bask in its glory.

Here is the full she-bang:

Turkey
Mash Potatoes
Candied Sweet Potatoes
Polenta Cornbread Stuffing
Green Beans with Hazelnuts
Sugar Snaps
Cranberry Sauce
Pumpkin Cheesecake
Apple Pie


Turkey

This was the first bump in the road. The Boy works near the main meat market in town and they were actually offering fresh turkeys for Thanksgiving (everywhere else was selling frozen birds). Goody gumdrops! We ordered a 10-12 pounder for pickup on Saturday. The big day comes and we get given 15 pounds of pure turkey. At first we thought that it would be all right, the Australians are a hungry bunch. But alas, the problems were only just beginning. First off, the damn thing barely fit in the fridge- everything had to come out. This also meant that I could not brine it (my preferred method). Not the end of the world. Ah, but try sticking that thing in a roasting pan. I have a fair amount of pans and roasters but that was one hell of a wide load and didn’t fit in anything! In the end I managed to stick it in a pan at a funky angle. The moral of this story kids is that you need to make sure you have a roasting pan that will fit your turkey even if the one you get is bigger than expected.

Since I couldn’t brine the thing, I took a leaf out of the Martha Stewart Living Thanksgiving issue and draped a butter-soaked muslin on the turkey. Basically, you melt a stick of butter, into which you dip a piece of muslin (the size of which when folded into quarters covers the turkey with extra to tuck in along the sides) and squeeze the excess butter from it. Place over the turkey and baste with the remaining butter every half hour. For the last half hour remove the cloth if the bird is not browned. My turkey emerged from the oven such a beautiful golden brown shade that it looked like it should be on a magazine cover.

Mashed Potatoes

Everyone likes mash and everyone likes his or her mash done differently. Some like it with skins still on, some like it lumpy, some like it smooth and some like it creamy. On Sunday I was in the mood for rich and creamy mash. Potatoes were boiled, drained and mashed with the red skin on. I started with a generous dollop of butter and roughly a ½ cup of warmed milk. Mash together and add small amounts of butter and milk until the consistency is smooth and slightly runny and the taste is definitely rich.

Candied Sweet Potatoes

Mmmm- my favourite part of Thanksgiving. The dish that reminds me of being a kid and feeling like I’ve struck gold and am getting dessert with my dinner. The dish that grosses any non-American out that is until they taste it. The dish that got the most compliments on Sunday and was the most requested recipe. It is a combination of my mother’s recipe with a glazing method that I saw on telly and a few additions of my own.

Ingredients:

5 Sweet Potatoes
150 g. Brown sugar (if you have light and dark use a mix of both)
125 g. Butter
1 tbsp. Cinnamon
1 tsp. Vanilla Extract
Dash of nutmeg
Juice of 1 orange
Good size glug of Rum
½ c. Walnuts, roughly chopped and toasted
1 can of pineapple in its own juice
1 bag of Mini Marshmallows

Heat oven to 200C.

Boil sweet potatoes until they are cooked but still firm (this time can vary depending on the size of the sweet potatoes but will be about 20 minutes). When cool enough to handle, peel and cut into ½ inch slices. Layer the slices into rows in an ovenproof dish that is deep enough to hold the glaze when it is added.

Drain the pineapple and break it up into chunks. Don’t worry about breaking up into uniform pieces- this is not an attractive looking dish. Sprinkle the walnuts and pineapple over the top.

In a saucepan, place the brown sugar, butter, cinnamon, vanilla extract, nutmeg, orange and rum and bring to a boil. Pour over the sweet potato mixture and bake for 10 minutes. Sprinkle the marshmallows over the top and cook until the marshmallows are melted with a light brown colour.

Polenta Cornbread Stuffing

This year’s food magazines’ Thanksgiving editions were of a particularly high standard this year. The choice of dishes for all cooking abilities using a plethora of standard and new ingredients was so great that it made it tough to decide what to cook. I wanted to try to use ingredients in the cupboard to keep costs down so this recipe from November’s issue of Gourmet ticked all the right boxes.

Ingredients:

¼ c. Butter
6 ½ c. Water
2 tsp. Salt
2 c. Quick Cooking Polenta (I don’t know if what I had was put you will definitely know when you have cooked it to the right consistency)
1 lb. Italian Sausage, casings removed (I didn’t have it so I used a good quality herby sausage)
2 tbsp. Olive Oil
1 Onion, chopped
1 Garlic Clove, minced
2 c. Chicken Broth
1 c. Finely grated Parmigiano Reggiano
½ c. Finely chopped Flat Leaf Parsley

Butter a shallow baking pan. Bring 6 c. of water with salt to a boil in a heavy pot. Add polenta in a steady stream whilst stirring with a long handled spoon. Simmer, stirring constantly, for 5 minutes. Polenta will become very thick. Add 3 tbsp. butter and stir until butter is incorporated. Spread polenta in buttered pan and chill, uncovered, until firm, about 15 minutes.

While polenta is chilling, cook sausage in 1 tbsp. of olive oil while breaking up lumps. Cook until no longer pink- about 3 minutes- then transfer to a bowl. Add onion to skillet and cook over medium heat until browned. Add garlic and cook, stirring, until fragrant, about 30 seconds. Add remaining ½ cup of water and stir up browned bits from bottom of the skillet, then add onion mixture and chicken broth to sausage.

Preheat grill. Melt 1 tbsp. butter with remaining tablespoon of oil in a small saucepan. Invert polenta onto a large cutting board, and then cut half of it into ½ inch cubes. Toss cubes in the butter mixture in a bowl. Return the cubes to the baking sheet and place 3-4 inches under the grill and broil until there are golden patches. The recipes says to do this for 8-12 minutes, but under my grill it took 15 minutes to get all sides a golden colour.

Preheat oven to 450F. Butter a baking dish.

Coarsely mash remaining half of polenta and add to sausage mixture. Add polenta cubes. ½ c. cheese, parsley and pepper to taste and toss until combined well. Transfer to baking dish. Sprinkle top of stuffing with remaining cheese, cover and bake until heated through, about 20 minutes.

Remove foil and bake until top is lightly browned, 10-15 minutes more.

Green Beans with Hazelnuts

Trim green beans and blanch 2-3 minutes in boiling water. Drain and immerse in cold water to stop the cooking. Toast a handful or two of roughly chopped hazelnuts in a pan or in the oven. Heat a skillet with ½ tablespoon of olive oil and add green beans. Heat until warmed through. Add hazelnuts and drizzle a little walnut oil over.

Sugar Snaps

Blanch Sugar Snaps. Put ½ tablespoon of olive oil and heat sugar snaps through. Add the juice of 1 orange and reduce by half. Eat up.

Cranberry Sauce

This is another thing that everyone likes in different forms. As a kid I liked the canned jellified version that kept the tin marks even after you took it out of the can. As I got older I’ve gotten a fondness for homemade versions. This year’s consisted of me boiling up the berries, adding a bit of OJ and straining it so it was more jam like than jelly like. To each his own so I will leave you to your own preferred sauce.

Pumpkin Cheesecake

This became another mini drama. I always get my recipe from the wrapper of that name brand canned pumpkin that seems to have a monopoly on the canned pumpkin market. My cans didn’t have the recipe so I trolled the internet and lo and behold there are way too many out there. I picked one from the Nestle website.

First off, I fucked up the measurements and wasn’t paying attention and measured the cream cheese in American and measured the pumpkin in British cups. The result was that the first batch tasted more like Pumpkin Pie instead of Pumpkin Cheesecake and I hate Pumpkin Pie. I realised I needed more cream cheese but of course I had no more and had no time to nip out to the shops. Fortunately I had some ricotta in the fridge (that was earmarked for a ravioli filling) and dumped the tub in the pumpkin mixture. The mini cheesecakes were rich tasting yet had a slightly lighter taste than regular cheesecake. I also recommend using ginger snaps instead of graham crackers; it gives the flavour more depth and helps cut the richness of the cheesecake.

Ingredients:

For the crust-
1 ½ c. Ginger Snap crumbs
1/3 c. Butter, melted
¼ c. Caster Sugar

For the filling-
24 oz. Cream Cheese, softened
1 c. Caster Sugar
¼ c. Brown Sugar, packed
2 eggs
15 oz. Canned Pure Pumpkin
5 fl. Oz. Evaporated Milk
2 tbsp. Cornflower
1 ¼ tsp. Ground Cinnamon
½ tsp. Ground Nutmeg

For the topping-
16 oz. Sour Cream
1/3 c. Granulated Sugar
1 tsp. Vanilla Extract

Preheat oven to 350° F. Combine ginger snap crumbs, butter and granulated sugar in medium bowl. Press onto bottom ½ inch thick in each muffin cup. Bake for 4 to 6 minutes (do not allow to brown). Cool on wire rack for 10 minutes. Put to one side.Beat cream cheese, granulated sugar and brown sugar in large mixer bowl until fluffy. Beat in eggs, pumpkin and evaporated milk. Add cornstarch, cinnamon and nutmeg; beat well. Pour into muffin cups.Bake for 35 to 45 minutes or until edge is set but center still moves slightly. While cheesecakes are cooling, combine sour cream, granulated sugar and vanilla extract in small bowl; mix well. Spread over surface of warm cheesecake. Bake for 5 minutes. Cool on wire rack. Refrigerate for several hours or overnight.

Apple Pie

This has got to be one of my all time favourite desserts. I love pretty much any fruit dessert but there is sometime so warming and consoling about a desert with baked apples. It’s like a warm hug in your belly. I found this recipe in Bon Appetit in 1999 and it is the dessert I get asked to make most often. I have used this as a guideline and re-interpreted other apple desserts. Make sure you use baking apples or else they will turn to mush. I made the mistake of not double-checking which apples I bought and got a couple of eating apples and had some applesauce in my pie.

I have not given the piecrust recipe since you either like to make pastry or you are happy to buy ready made shortcrust pastry. Below is only the recipe for the filling.

Ingredients:

5 lbs. Bramley Apples (or other cooking apple) peeled, cored, cut in ½ inch thick slices
2 tbsp. fresh lemon juice
6 tbsp. butter
1 c. Brown Sugar, packed
2 tbsp. Flour
1 ¼ tsp. Chinese Five Spice
Toss the apples in the lemon juice. Melt the butter in a heavy pot over medium heat. Add apples and brown sugar; cook until apples are just tender, about 15 minutes. Using a slotted spoon, transfer apples back to bowl. Boil juices until thick, about 15 minutes. Pour juice over apples; cool completely. Mix in flour and five spice. Add filling to pie shell. Bake in oven at 375F.

Wednesday, November 15, 2006

A taste of home - part uno

Food always serves as a reminder of home when we are away from what we are accustomed to. It comforts when you are down and it inspires you when you celebrate. It acts as a quick and simple connection to family when we need it. One of the things I find toughest about being away from home is the lack of Mexican food. The proper, hearty, rustic food I grew up with. Although there has been a recent spate of Mexican restaurant opening in London- Green & Red, Mestizo, Taqueria, Daddy Donkey, Mercado - I find it tough to pay £5 for what should really be a $3 burrito at my uncle’s restaurant in San Diego. I’ve decided to make it my mission in the upcoming months to try these places since Mexican friends have recommended a couple of them.

Which brings me to my point. A couple of months ago Johanna, from The Passionate Cook, asking if I was interested in helping her organise a day of Mexican cuisine. Since the only way I get Mexican food here is to make it myself- how could I resist! So Johanna, myself and Iliana- or how I’ve taken to calling us- decaf (Johanna spent a year in Mexico), half caff (I’m the half breed) and full caff (Iliana was the only 100% Mexican there) put together a superbly authentic feast for the group coming over.

Our table of food was massive so I'm breaking this up into a multiple entry feast!

To nibble on we had jicama (pronounced he-ka-ma; top picture)- one of my favourite snacks. I used to always bring some cut pieces back to London when I first moved here but a couple of years ago when in Chinatown I saw my beloved root snack. Jicama is of course its Mexican name, here it goes by the name yam root. When bought in the shops, it is bulbous shaped with light brown skin and usually a bit of dirt on it. It's eaten raw so to prepare it, cut into half or quarters (depending on size) and peel away the brown skin with a paring knife. Cut into sticks or chunks to serve. You can easily use it in salads for a bit of crunch (similar to a water chestnut) but my favourite way to eat it, and how we ate it on Mexi-day, is to cut it into sticks, squeeze a lime over and sprinkle chili powder on top.

A little research on jicama turned up some intersting facts- jicama can weigh up to 50 pounds and a 3.5 ounce serving has 39 calories and 25% RDA of vitamin C. Not bad for a rather unattractive looking tuber.

We also snacked on sopes (pronounced so-pez). This was the start of our "work for your supper" dishes. Fortunately I had some Maseca back from my last trip home so no one had to hand grind corn to make the corn flour that is used to make sopes (and tortillas). Iliana got the masa (dough) ready after which Jenni and Vanessa made dough balls (picture left). I heated up a frying pan and flattened each ball into a 1/4 inch thick disc and cooked both sides in the pan. The gals then had the task of shaping the cooked patties into their final shape by creating a slight ridge along the edge so that the filling would not fall out.

The finished product on this day (picture below right) was filled with beans, lettuce, cheese and a bit of salsa. In this case the cheese was Crumbly Lancashire which I have found to be the closest I'll get to Queso Fresco. Feta can also be used but I find it a bit too tangy for my taste when used in Mexican food. The salsa was my mother's recipe for Salsa de tomatillo (pronounced to-mah-tee-yo)- the recipe is below as well and its uses are not confined to sopes. It can be used for a dip, for enchiladas, for fish- anywhere we you want a tangy sauce.

Tomatillos look like large, green versions of the Cape Gooseberry (also know as Physalis) and add a tart flavour to many Mexican sauces. They are related to tomatoes and are members of the nightshade family (click here for more info on tomatillos).

Sopes

Ingredients:

500 g masa harina (corn flour) – if your masa is very yellow, you may want to mix this with some regular flour
1/2 teaspoon baking powder
1/2 teaspoon salt
1 and 1/2 cups warm water
Vegetable oil, for frying


Preparation:
Mix flour, baking powder and salt, then add the warm water. You may need a little more warm water to make moist, smooth dough.

Traditional sopes forming method: Make balls the size of a walnut, a few at a time, and keep the dough in a plastic bag to prevent it from drying out. Moisten a cloth napkin or tea towel and spread out on a flat surface. Roll each ball of dough in moistened palm of you hand until smooth, lay on the damp towel, cover with a plastic bag, and press down with your hand.

To shape the patty, flatten again with a small can or flat-bottomed glass into a perfectly smooth circle 2 to 2 1/2 inches (5 – 7.5 cm) in diameter. It should be about 1/4-inch (5 mm) thick. Peel the plastic bag off the top, then lay the tortilla in your hand and peel off the damp cloth. Smooth any rough edges with your fingers and the tortilla is ready to fry.

Topping: frijoles, queso fresco (Lancashire crumbly or mild feta), salsa verde

(recipe Iliana Villareal)

Salsa Verde (Green Sauce)

Ingredients:

500 g Tomatillos (green tomatoes)
1-2 cloves garlic (crushed)
1 onion (finely chopped)
1-2 jalapeno chiles (depending on how hot you like it)
1 handful fresh coriander (chopped)

Preparation:
Remove husks from the tomatillos and wash to remove any stickiness.

Boil the tomatillos and garlic in a pot, deep enough to cover them completely, for roughly 15 minutes or until the tomatillos change colour slightly.

Put the tomatillos, garlic, jalapenos and half of the chopped onion in a blender or food processor. Blitz until well blended. A little water can be added if the salsa is too thick for your liking.

Pour into a bowl and stir in the cilantro and remaining onion.

(Recipe Xochitl Ireland)

Another dish that I thought was essential for anyone wanting to know more about Mexican cuisine is Ceviche (pronounced see-vee-chay). Even though I'm not big on fish, I make this for parties and it reminds me of family get togethers when I was a kid.

Ceviche is great on a hot summer day as a starter or a light lunch. The fish can be marinated 5-6 hours or overnight (which will give it a more citrussy flavour). Although finely dicing the vegetables is labour intensive, it can be done ahead of time so that the final dish can be quickly assembled.

One important note on ceviche- I recommend buying a few extra lemons/limes as it is essential that there is enough juice to completely submerge the fish. The juice pickles and 'cooks' the fish; any fish that isn't covered in juice will still be raw. This shouldn't put anyone off making ceviche as it is easy to do if prepared properly.

Ceviche

Serves 4-6 (depending on if eaten as a starter or main)

Ingredients:

For the fish:
1 white fish fillet, cut into small dice
juice of 6-10 lemons and/or limes

To serve:
1 carrot (finely diced)
1 onion (finely diced)
1 cucumber (deseeded and finely diced)
1 green pepper (finely diced)
½ bunch of fresh coriander (finely chopped)
1 jalapeno chile (finely chopped) (optional)
salt
pepper
garlic powder (optional)
salted crackers or unsalted tortilla chips

Preparation:
Place the fish and lemon juice in a glass bowl and leave to marinate for 5-6 hours or overnight in the fridge. There should be enough juice to completely submerge the fish.

About 1 hour before serving, remove the fish from the fridge and break down the chunks of fish using your hands. (Since the fish is served with crackers, the finer the chunks are broken down, the easier it is to serve and eat.) Return to the fridge.

Just before serving, gently stir in all the vegetables. Add salt, pepper and garlic powder (if using) to taste.

Serve with crackers or lightly salted / unsalted tortilla chips.

(Recipe Xochitl Ireland)

I think I'll call it a day for now- this should get you started! The next part will follow shortly and will cover yummy treats like Chiles Rellenos, Tinga de Pollo, Frijoles and Flan.

I'm craving it all again just thinking about it...